Technical Notes
Contents
Please click on any title to go to the article
Free Photo-editing Apps and Software
A beginner’s Guide to Manual Mode.
How to take sharper photos
Useful Composition Skills
Phototips and how to use them
Luminar, an affordable alternative to Adobe Lightroom?
An easy Photoshop template for competition entries
Free Photo-editing Apps and Software
Snapseed
This has a Curves tool which allows to liven up or dull down the colour of your images. It also tracks every edit and allows you to change them retrospectively.
It is easy to use and there are no adverts even though it was developed by Google. It is for IOS and Android.
Gimp
This is for Linux , Windows and MAC.
This is a free, open source Photoshop alternative. Whilst similar to Photoshop it gives you access to lots of plug-ins which you can use to process RAW photos.
It is a bit fiddly to use but has lots of options and is free.
PIXLR E
This has free features that have a high level of control over JPGs and PNG files. You can edit in layers and use masks to protect areas of the image you do not want to edit.
If you want more you can open PIXL X for an easier, quicker platform that is good for beginners.
PHOTOPEA
This will work on Photoshop files and is also great for aspiring Photoshop users.
Also for IOS and Android are: PICSART and FACEAPP
A beginner’s Guide to Manual Mode.
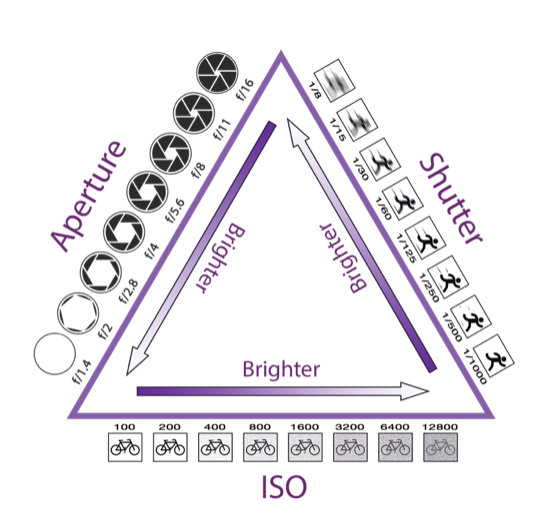
- Set ISO.
400 – cloudy weather
800 – dark
3200 – night
- Set Aperture
3 – 5.8 Slight blur
8 - 22 Wide depth of field
- Set shutter speed
1/125 Portraits
1/250 Freeze motion
1/500 Sports and extreme motion.
Tips.
Practice makes perfect. Digital photography allows you to experiment and learn how to get it right. Shoot on Raw. Check your histograms to see if you have got the balance of exposure right. Watch your focus on low apertures.
HOW TO TAKE SHARPER PHOTOS.
Use a faster shutter speed.
Remove any unnecessary filters.
Use a smaller aperture.(F9 to F11)
Use live preview and zoom in. You can then use manual focus to sharpen your images.
Use a tripod….. or at least hug a tree.
Keep your lens clean.
Shoot remotely for greater depth of field.
Handheld? Turn on image stabilization.
As a last resort use software sharpening.
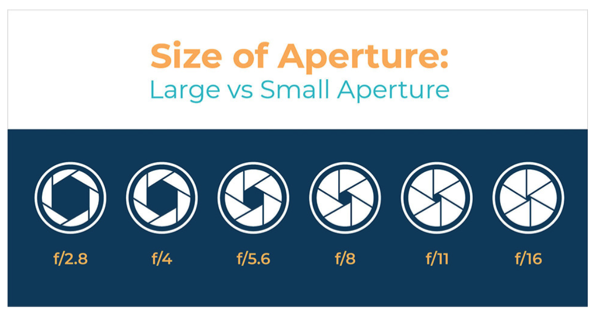
One important part of aperture that confuses beginning photographers more than anything else. This is something you really need to pay attention to and get correct: Small numbers represent large, whereas large numbers represent small apertures.
A large aperture value like f/2.8 will result in a large amount of background blur (ideal for shallow focus portraits), while values like f/8, f/11, or f/16 will help you capture sharp details in both the foreground and background (ideal for landscapes, architecture and macro photography).
More Stuff
When taking images of faces use spot centred focus rather than all over focus. You can also use automatic focus. Point the highlighted square at an eye to focus by pressing the shutter halfway down. Move the camera to recompose the picture and then press the shutter all the way down.
One shot or single shot is best for static objects. For moving subjects use AI servo or continuous. This can be set either with a button on the camera or in the menu.
Lenses can be fitted with an image stabilisation button. Switch this off when using a tripod to get sharper images.
Sony and Pentax cameras may have body based anti-shake systems that will work with any lens.
Use a tripod and longer exposures for static images. The quality of you tripod makes a difference to the stability of your camera so get the best one you can afford. You can hang something heavy from the tripod to stop it moving.
With manual focus you can zoom in on live view to improve the quality of focus.
Remember you need to experiment to perfect your skills.
Useful Composition Skills
Composition, placement or arrangement of visual elements to enhance an image for a viewer can create instant impact. It can draw the viewer’s eye and convey mood and emotion. It is also especially effective for achieving good results for competitions.
1. Rule of thirds
Divide the view finder into nine equal squares (some cameras will do this for you). Put the most important part of the image on one of the dividing lines. Keep horizons on the thirds as well.
The horizon is on the upper third and the two barges are also on the thirds.
|
|
|
|
|
|
|
|
|
|
|
|
|
|
|
|
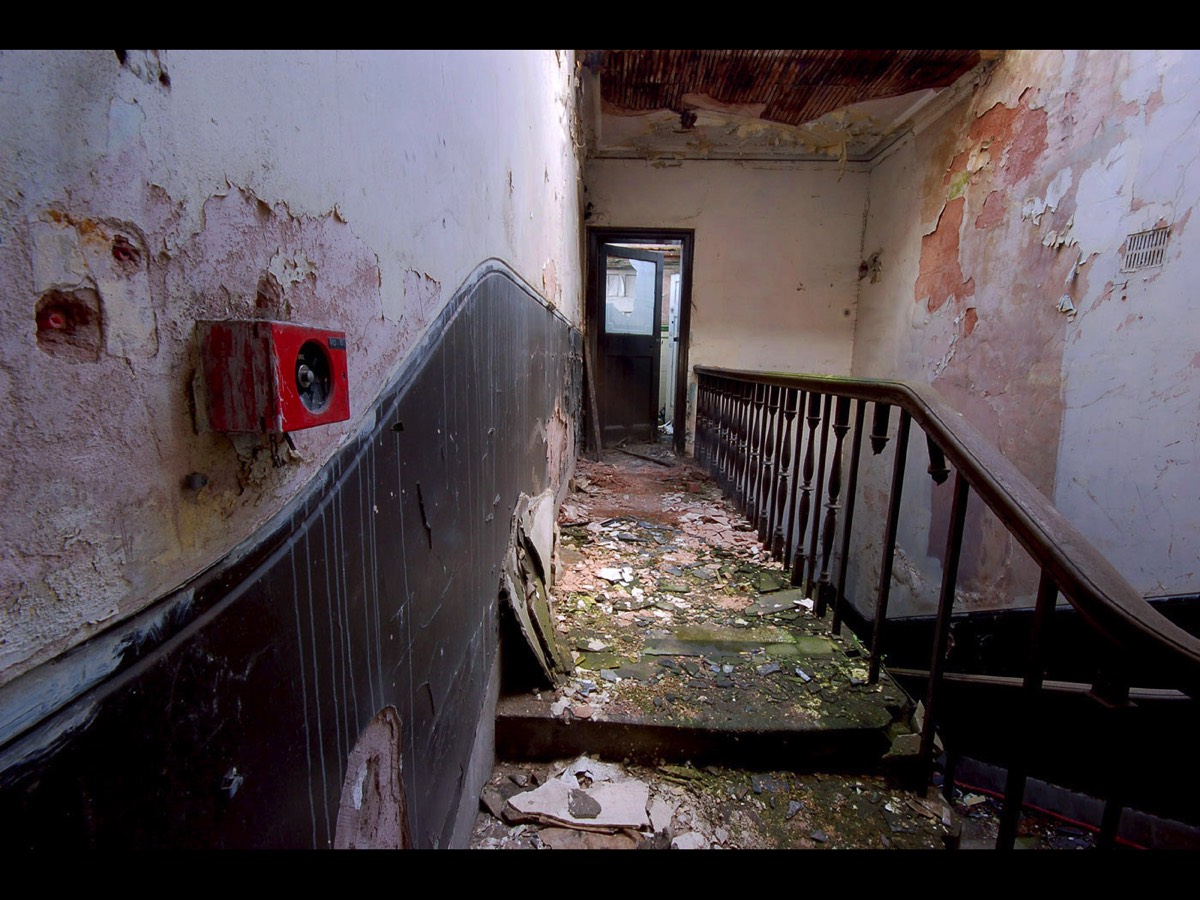
2. Leading Lines
These are needed to lead the eye through the image in an appealing way.
The railings in this picture lead your eyes to the door.
These are needed to lead the eye through the image in an appealing way.
The railings in this picture lead your eyes to the door.
|
|
|
|
|
|
|
|
|
|
|
|
|
|
|
|
3. Different Perspective
Take your photo from a high or a low point to mix up the view, avoid bad backgrounds or create a more exciting perspective.
This picture has much more interest than a picture taken from eye level.
Take your photo from a high or a low point to mix up the view, avoid bad backgrounds or create a more exciting perspective.
This picture has much more interest than a picture taken from eye level.
And so does this.

|
|
|
|
|
|
|
|
|
|
|
|
|
|
|
|
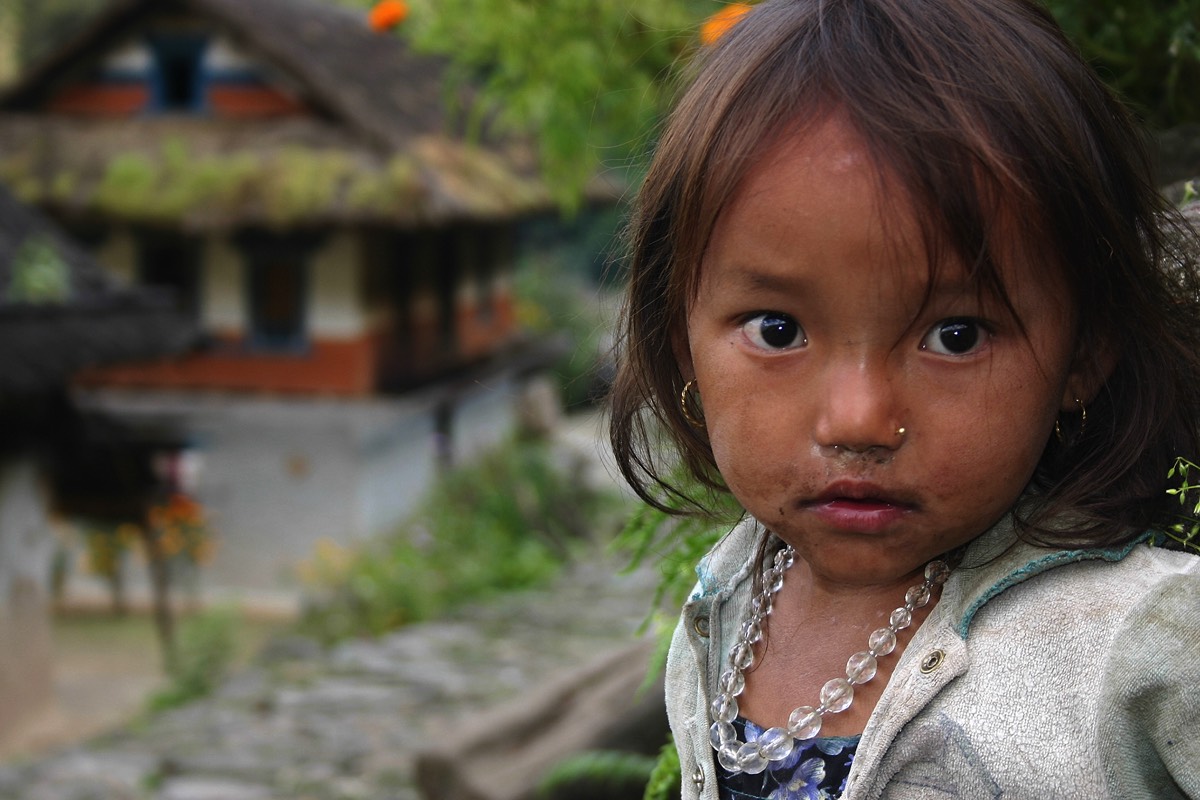
4. Keep the background simple or clear.
Objects, writing or detail in the background can distract from the subject. Check the corners and edges are clear of bright areas or objects that shouldn’t be there. Patches of distracting colour should be avoided. Don’t rely on photoshop to take them out if you can avoid it.
Objects, writing or detail in the background can distract from the subject. Check the corners and edges are clear of bright areas or objects that shouldn’t be there. Patches of distracting colour should be avoided. Don’t rely on photoshop to take them out if you can avoid it.
The woman stands out against the sky and the mountains behind are less intrusive from this angle.

|
|
|
|
|
|
|
|
|
|
|
|
|
|
|
|
5. Symmetry
Getting things even on both sides of the photo (especially buildings) can add a graphic dimension to the image.
Getting things even on both sides of the photo (especially buildings) can add a graphic dimension to the image.
|
|
|
|
|
|
|
|
|
|
|
|
|
|
|
|
6. Patterns
These make a photo look interesting. Breaks in pattern can draw the eye.
These make a photo look interesting. Breaks in pattern can draw the eye.
|
|
|
|
|
|
|
|
|
|
|
|
|
|
|
|
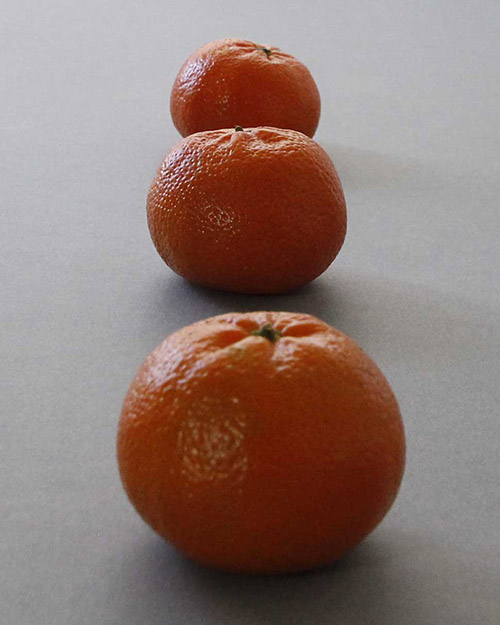
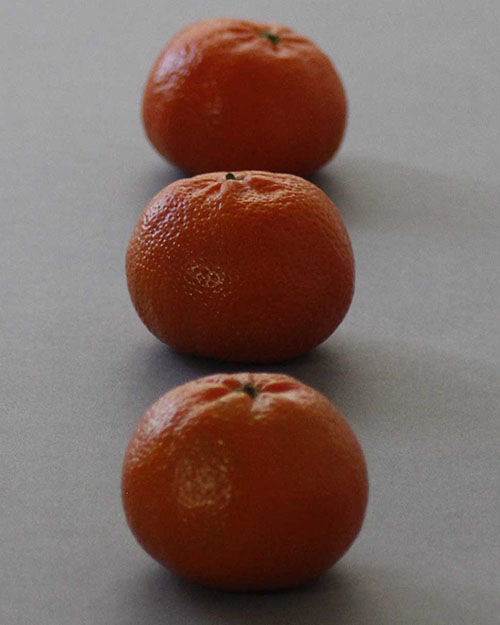
7. Odd numbers
An odd number of items is more interesting. Three subjects go down well with judges.
An odd number of items is more interesting. Three subjects go down well with judges.
|
|
|
|
|
|
|
|
|
|
|
|
|
|
|
|
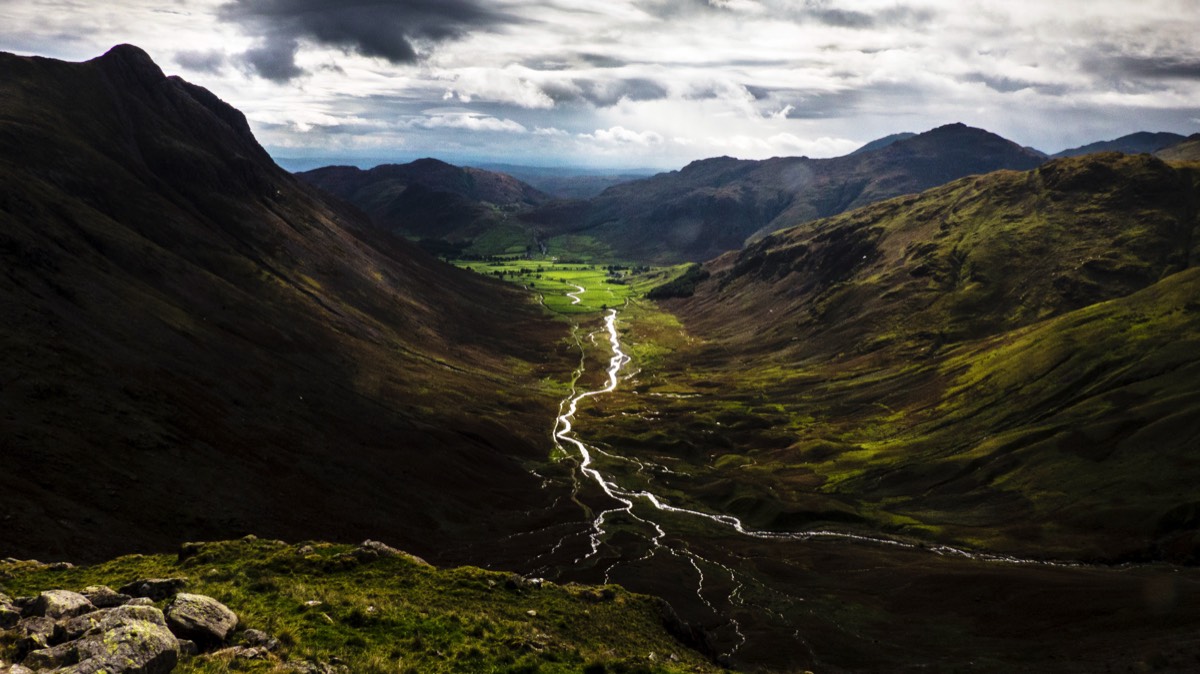
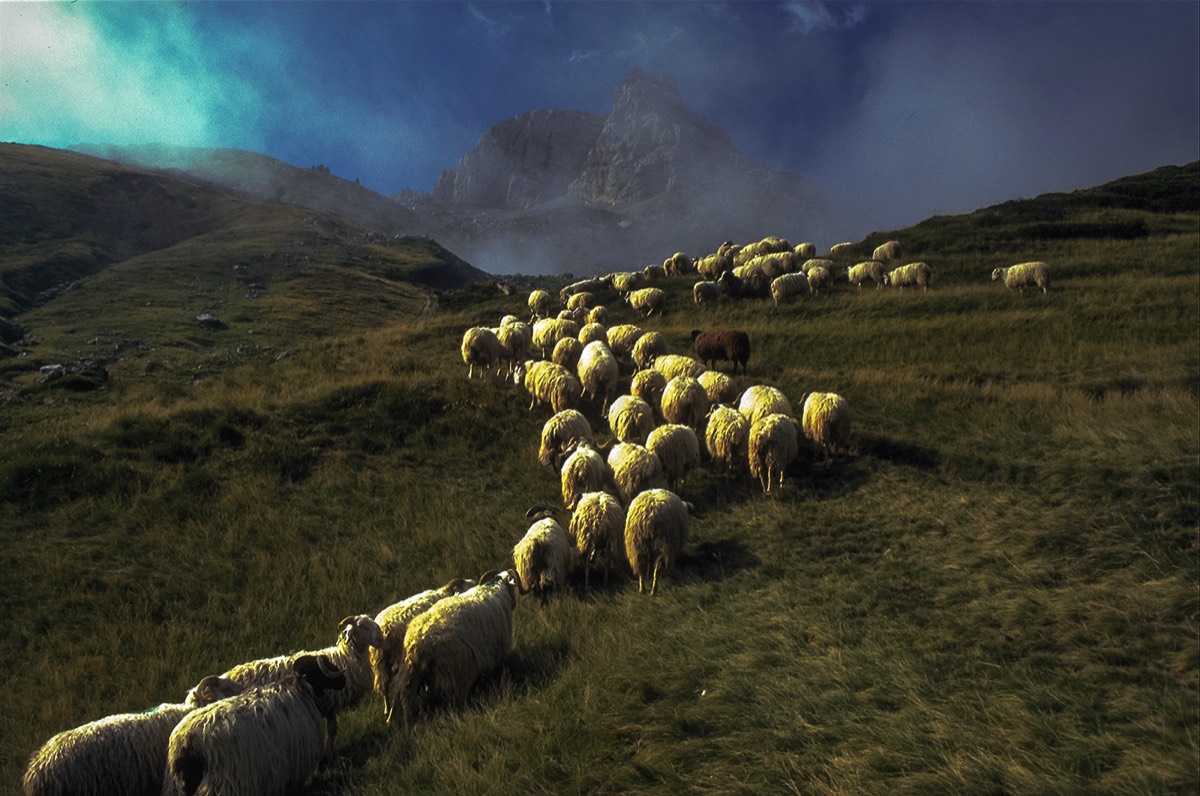
8. Framing
Use something in the photo to frame the subject. This makes it more interesting and brings your subject into the spotlight.
The mountains in this picture act as a frame for the valley along with the foreground, allowing the river to lead your eye to the centre of the picture.
Use something in the photo to frame the subject. This makes it more interesting and brings your subject into the spotlight.
The mountains in this picture act as a frame for the valley along with the foreground, allowing the river to lead your eye to the centre of the picture.
|
|
|
|
|
|
|
|
|
|
|
|
|
|
|
|
9. Depth of field
A shallow field depth of field can frame and draw out your subject. By blurring your back ground you bring your subject into the spotlight.
A shallow field depth of field can frame and draw out your subject. By blurring your back ground you bring your subject into the spotlight.
|
|
|
|
|
|
|
|
|
|
|
|
|
|
|
|
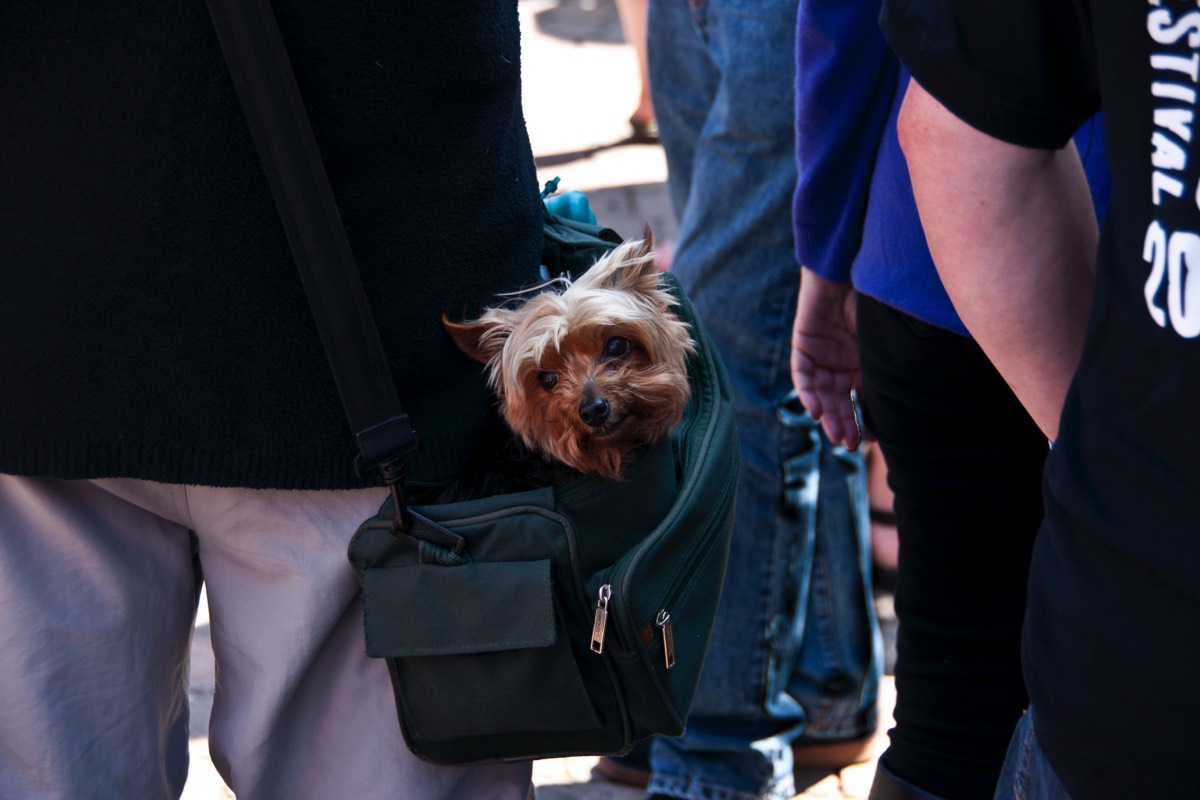
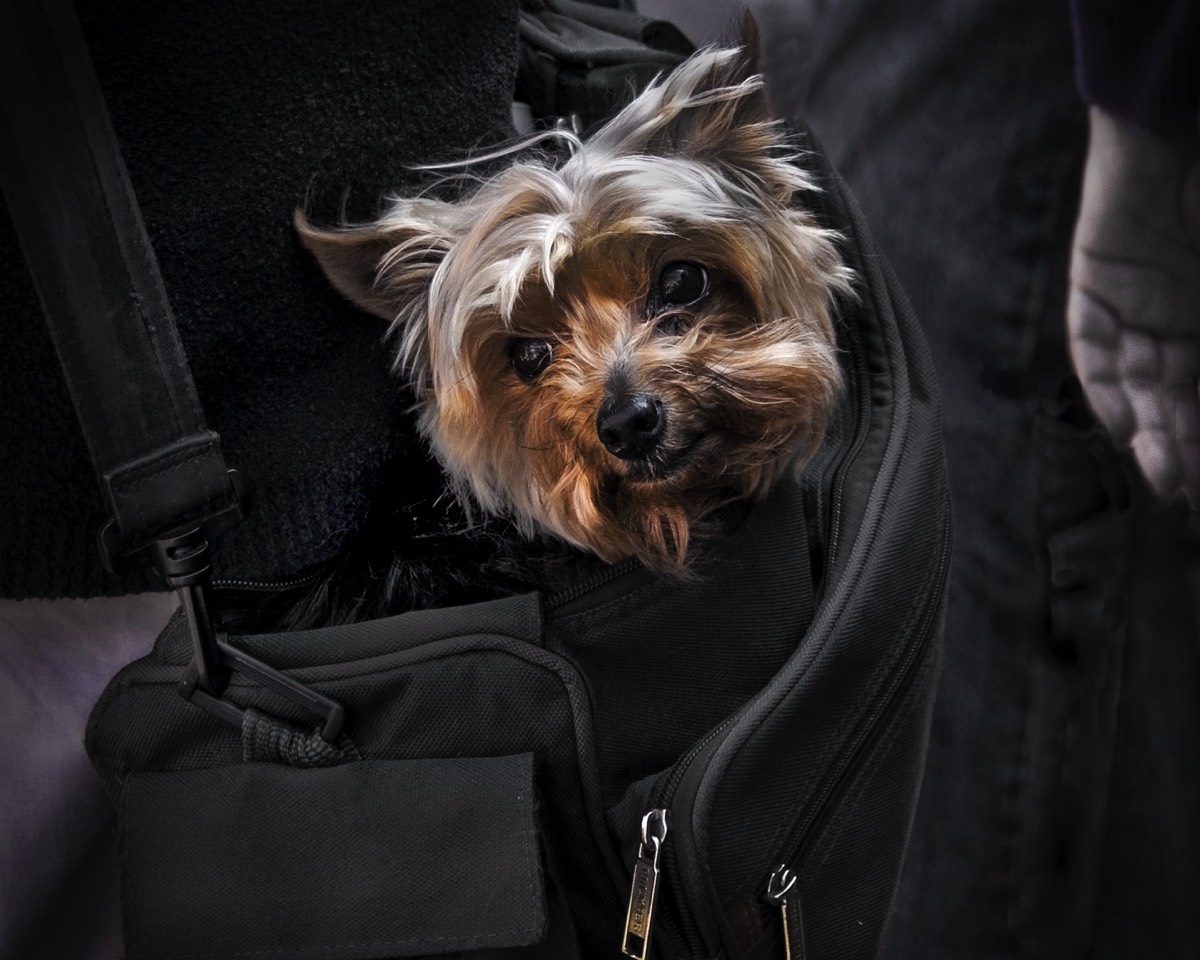
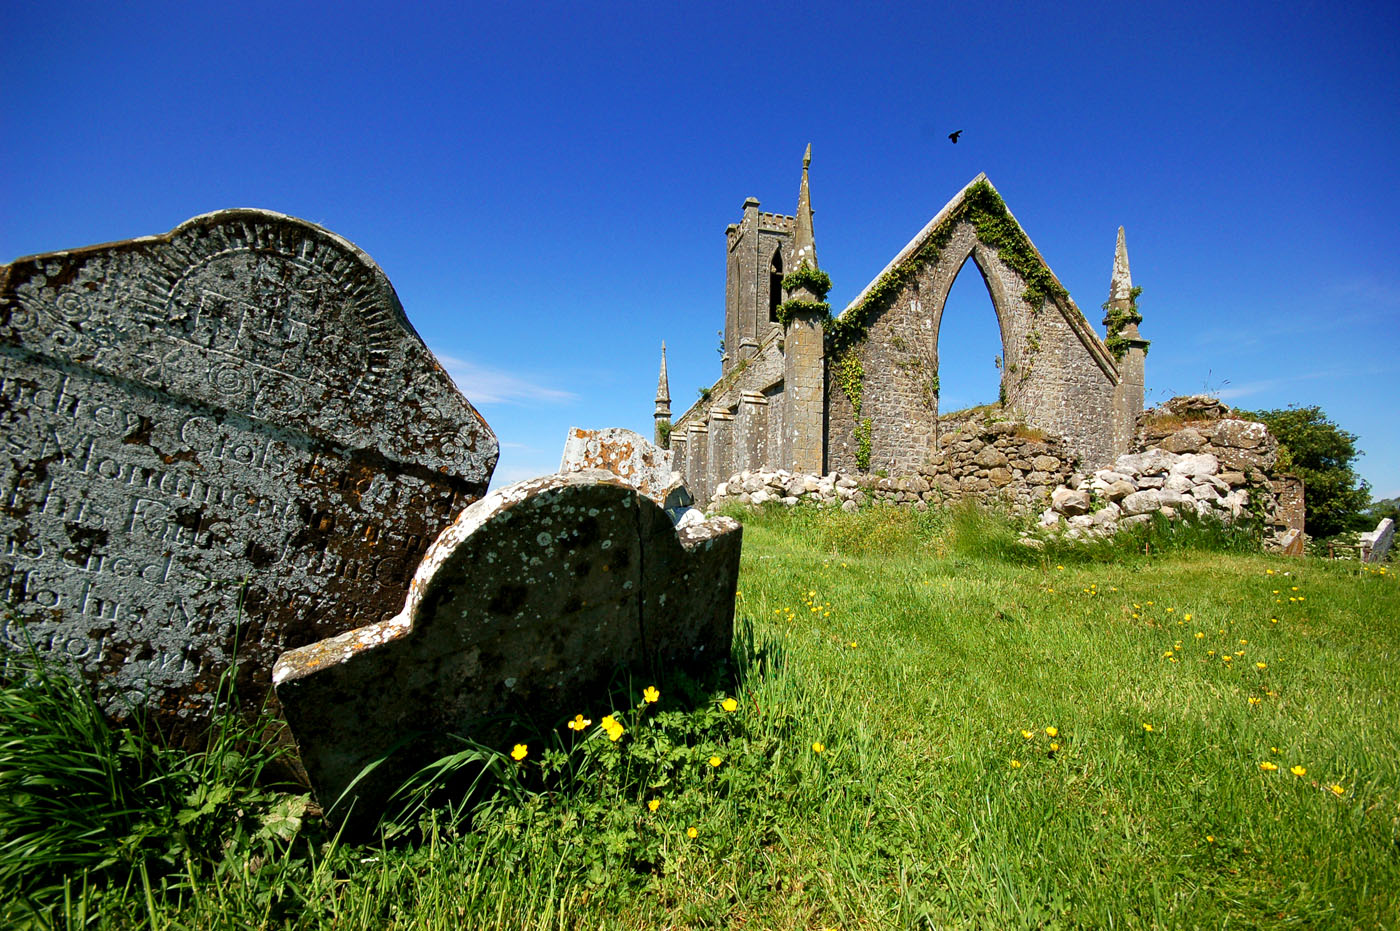
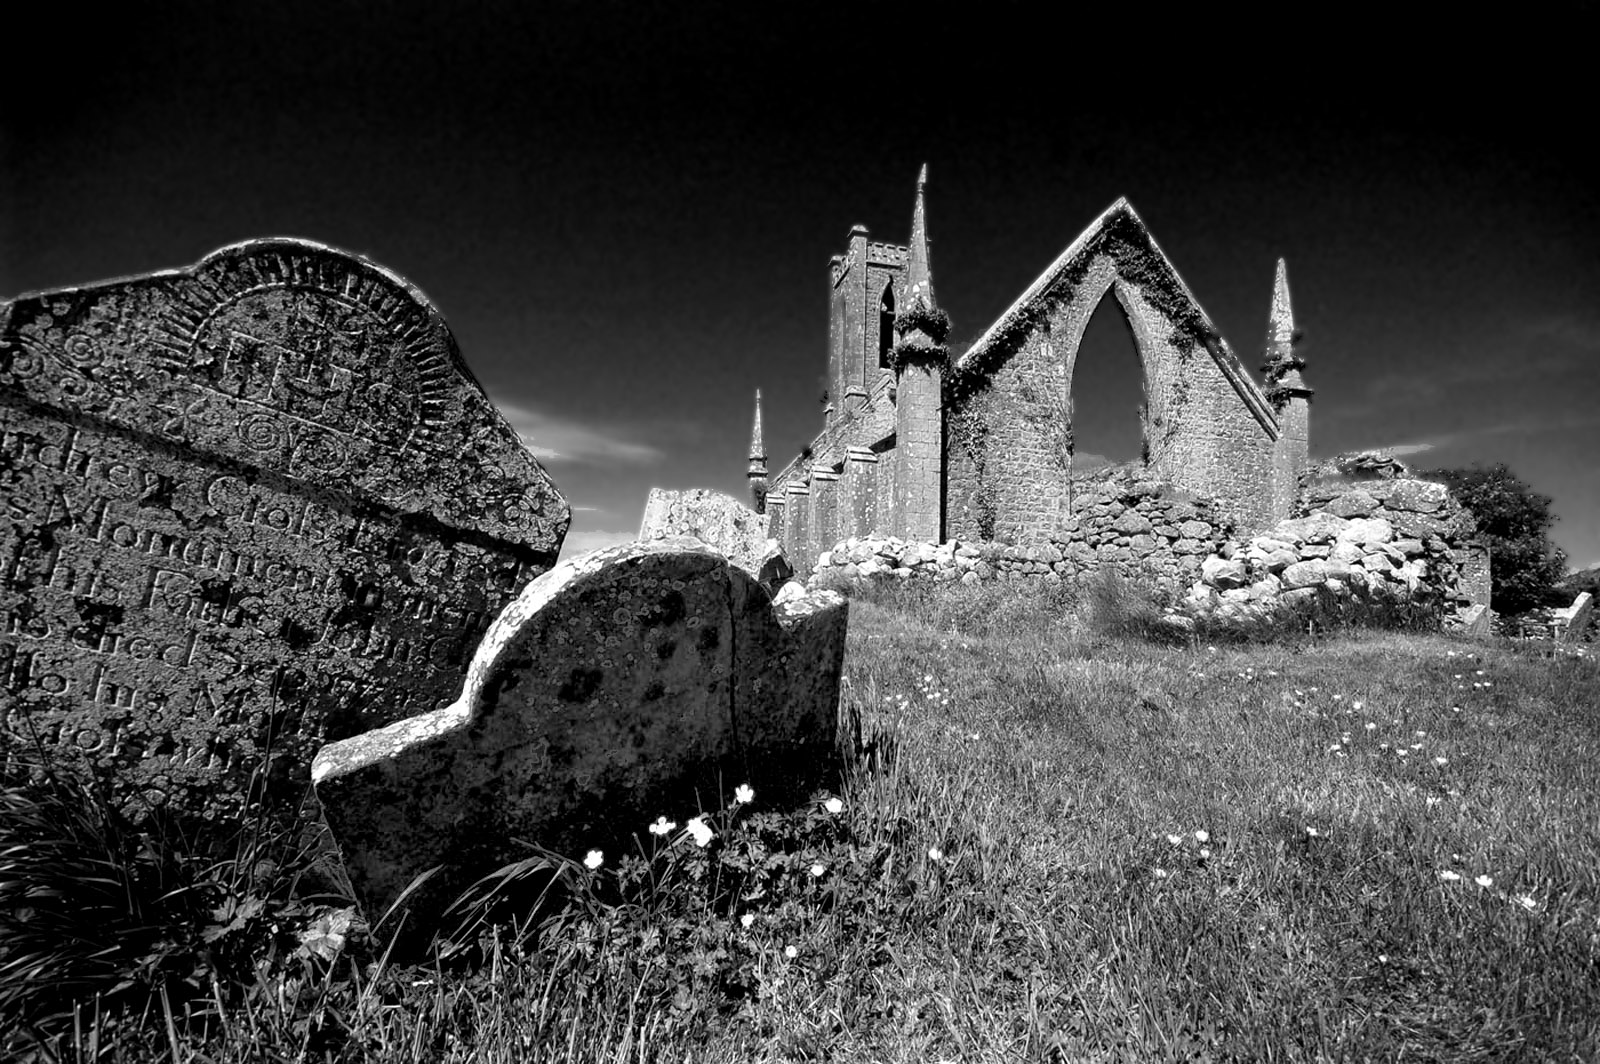
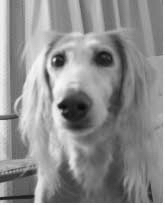
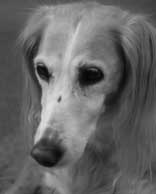
10. Close crop
You can make a subject the main focus by taking a close up, intimate shot.
Which of these two images on the right has the most impact? Would it have been better to get closer to the dog or was this impossible because there were people in the way? If you can get closer don’t be afraid to do so. You will lose detail if you have to crop too much.
|
|
|
|
|
|
|
|
|
|
|
|
|
|
|
|
11. S curve
Using an S curve can increase the strength of the composition. Streets, rivers and architecture can have S shapes in them.
Using an S curve can increase the strength of the composition. Streets, rivers and architecture can have S shapes in them.
|
|
|
|
|
|
|
|
|
|
|
|
|
|
|
|
12. Shapes
Use shapes in your picture to increase drama and strengthen your composition. Circles, ovals and triangles are best but any shape will do.
Use shapes in your picture to increase drama and strengthen your composition. Circles, ovals and triangles are best but any shape will do.
The three central circles form a triangle which draws the eye around the picture.
|
|
|
|
|
|
|
|
|
|
|
|
|
|
|
|
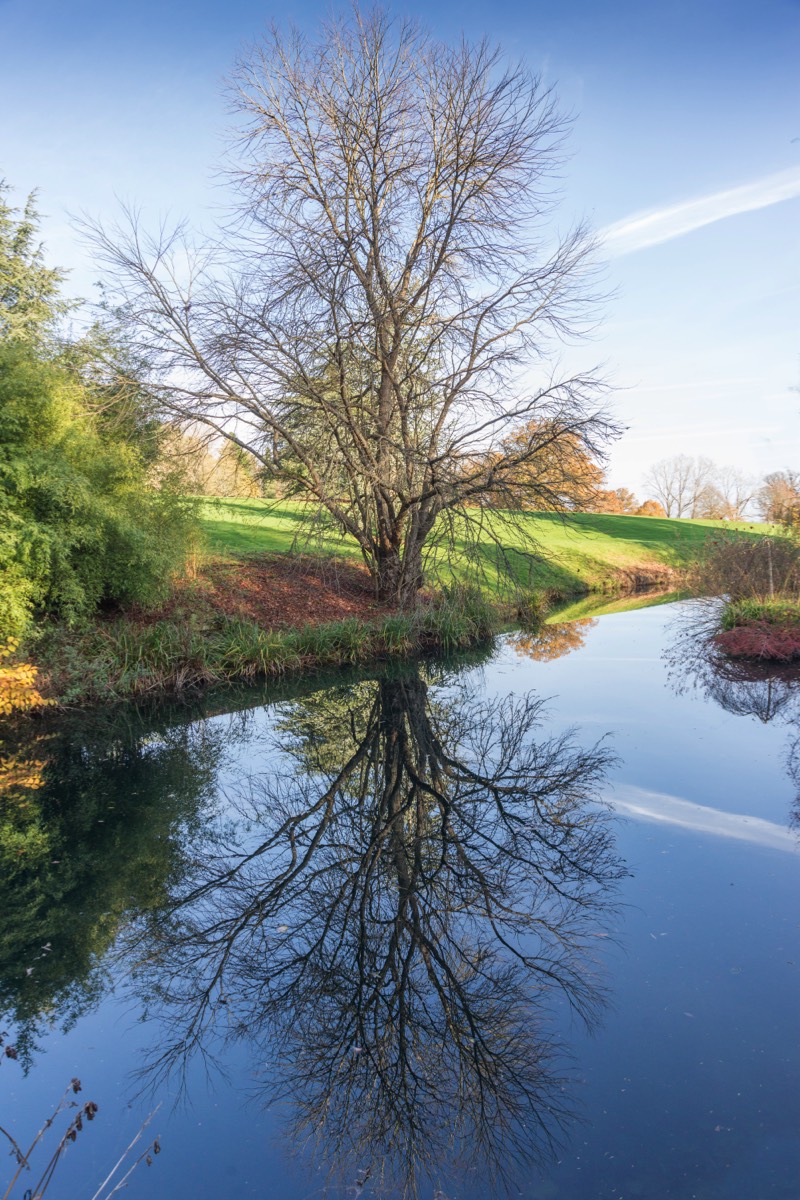
13. Reflections
These draw the eye into a photo and make it more interesting. It can be a puddle, a lake or a mirror.
These draw the eye into a photo and make it more interesting. It can be a puddle, a lake or a mirror.
|
|
|
|
|
|
|
|
|
|
|
|
|
|
|
|
14. Reverse the image
Sometimes an image looks better if it is reversed so it reads from right to left. Which one of these images makes you most comfortable to look at?
Sometimes an image looks better if it is reversed so it reads from right to left. Which one of these images makes you most comfortable to look at?
|
|
|
|
|
|
|
|
|
|
|
|
|
|
|
|
Before
After
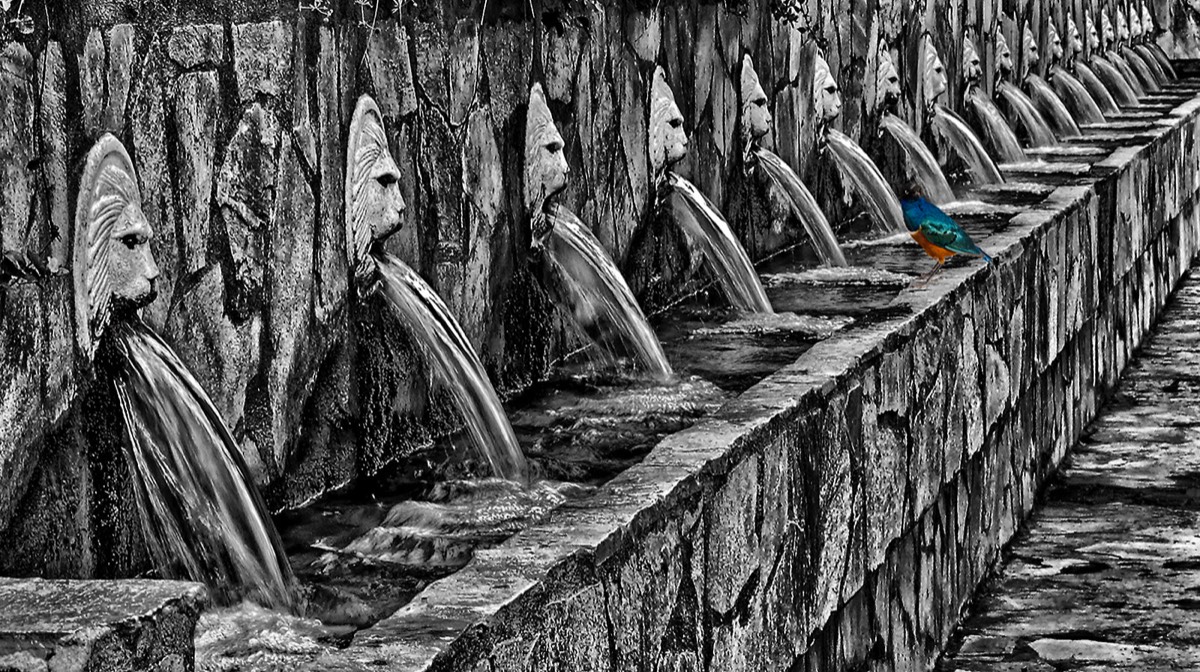
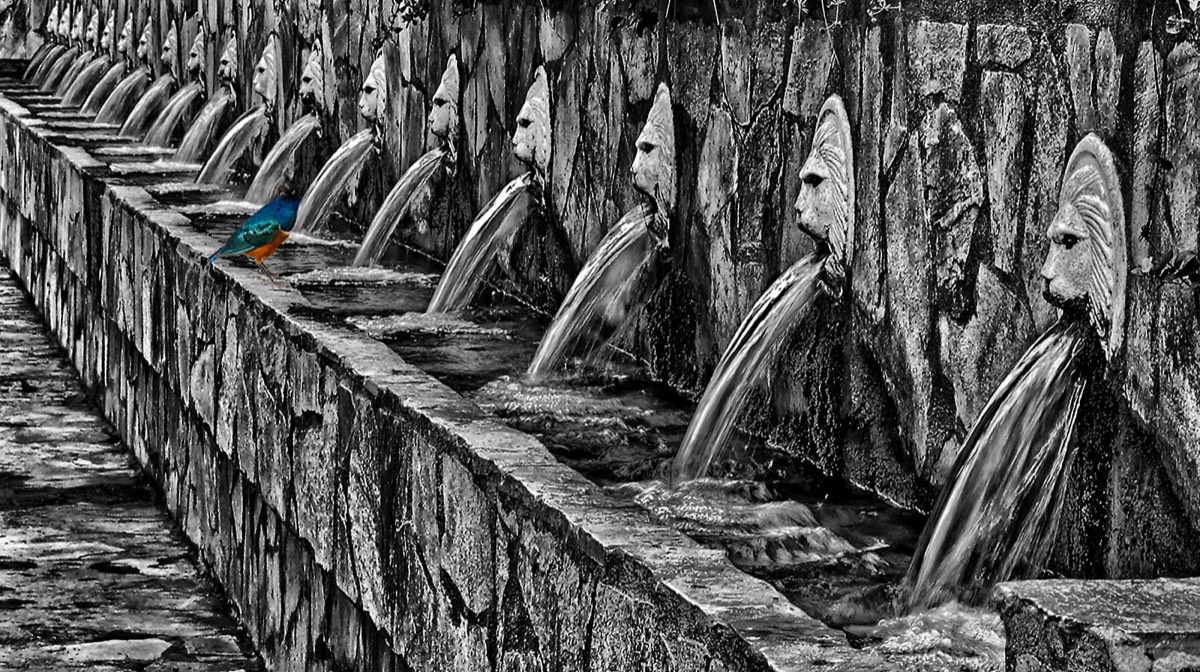
15. Monochrome
Some images may look better in black and white or sepia.
Which do you think looks best?
Some images may look better in black and white or sepia.
Which do you think looks best?
|
|
|
|
|
|
|
|
|
|
|
|
|
|
|
|
16. Breaking the rules
Rules are meant to be broken. Some great pictures do not follow these rules. Which rules does this image break?
Rules are meant to be broken. Some great pictures do not follow these rules. Which rules does this image break?

Posted by Kate Nicholls - February 2020
Phototips and how to use them
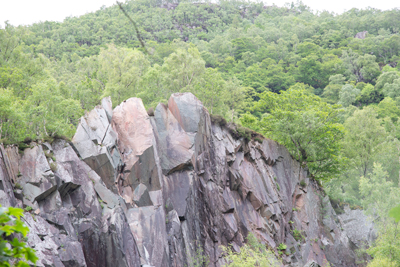
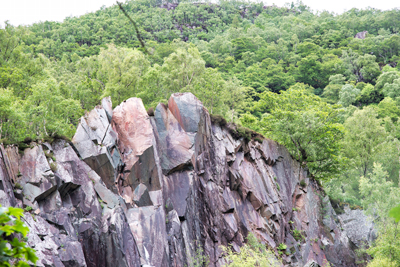
This was taken with the wide angled lens.
As you can see the satsuma at the back is the same width as the one at the front. I haven’t moved them.
My conclusion is that if you take pictures with a wide angled lens close to the subject the background is smaller in relation to the subject. If you take the picture with a telephoto lens from further away, then the background looks bigger in relation to the subject. The narrower the field of the lens the more this optical illusion comes into play.
Small cameras with non detachable lenses and phone cameras will have wide angle lenses. So if you take pictures close to someone's face it will make their nose look big! Stand back to lessen the effect.
I’ll try this out when I go to Mount’s Bay again but meanwhile if anyone wants to add more technical details to my rather basic understanding I would be pleased.
Posted by Kate Nicholls - July 2019
Luminar, an affordable alternative to Adobe Lightroom?
Luminar has been around for a couple of years now, presented as an affordable alternative to Adobe Lightroom. There are pros and cons to both pieces of software, so it can be difficult to know which is the best option.
It’s certainly easy to use, with a wide range of preset filters. The example on the right is an otherwise unadjusted photo with only the A, I Accent filter applied.
Luminar has the brush, radial and gradient masks that we are used to and has the advantage of layers, which make it almost a hybrid between Photoshop and Lightroom.
Luminar isn’t yet as good as Lightroom for cataloging images, but offers more in image processing/editing. I’ve had it for a couple of years now and I find that I use it as a plugin to Lightroom but if it continues to improve, year by year, as it has been, I can see it eventually replacing the Adobe suite.
See More on the Luminar website by clicking here
Before
After
Posted by Paul Stokes - July 2019
An easy Photoshop template for competition entries
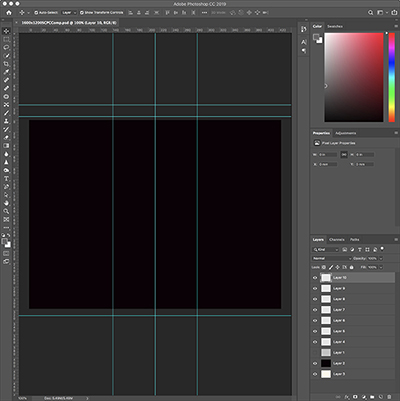
- Double click on the “1600x1200SCPCComp.psd” file to open it in Photoshop and check that layer ten is highlighted.
- In the File menu select “Place Embedded...” and locate the image you would like to use.
- Click place. If the image doesn’t fill the template Click and drag to size (image proportions will automatically stay constrained).
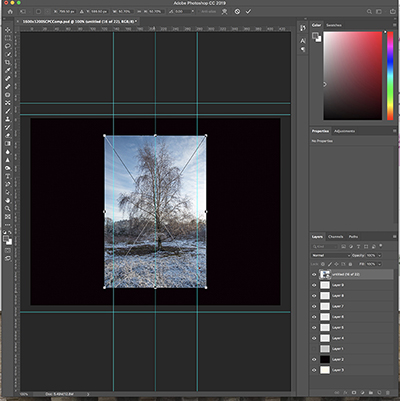
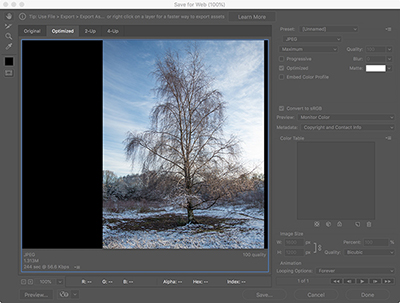
To save the next image, click on the ‘eye’ icon next to the one you have just done and highlight the next layer down:
This way several images can be saved in one session
When closing the template DO NOT SAVE IT and it will be preserved ready for next time.
Click here to download the Photoshop template.
Posted by Paul Stokes - July 2019
Website: © 2016 - 2024 Sutton Coldfield Photography Club/Paul Stokes. The copyright of each individual picture is owned by its author. Banner Photo by Dave Ballantyne.